 Suspension Parts
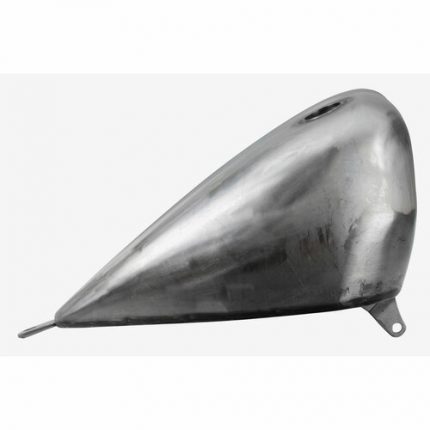
motorcycle gas tanks
A study shows that 3% of all registered vehicles are motorcycles in the United States. Motorcycles are the most popular and common type of on-road vehicle globally because of their small size, low cost, and lightweight. However, the motorcycle gas tank is crucial for determining how long you can use it.
That’s why it is necessary to maintain the motorcycle gas tank properly to get the best performance from it.
How To Fill A Motorcycle Gas Tank? (4 Simple Steps)
Owning a vehicle requires regular taking care of it and maintenance. It is not an exception for motorcycles. If you are a motorcycle owner, you can relate to it. One of the most prominent tasks is to refuel your gas tank.
Now that you have understood the importance of knowing the proper filling of a motorcycle gas tank, let’s look at the steps:
Step- 1: Do Some Planning
Getting your motorcycle next to the pump, the first thing you need to do is get off your bike. Yes, it might seem not worth mentioning, but it’s better to remind people of that. Accidents could happen while filling a motorcycle gas tank.
If a fire breaks out while filling, you will be burnt, not having enough time to get off the motorcycle. So, it’s always better to get off the vehicle while refueling, be it in the case of cylinder cars or motorcycles.
Step- 2: Take Off Your Helmet
You might want to take off your helmet now and rest the motorcycle on the side stand. Taking off the helmet is not necessary, but it has benefits. The extent to which your tank has been filled can be realized by careful observation of the gurgling sound of the fuel inside the tank.
If you take off your helmet, you may be able to observe the level to which the fuel has been filled and prevent spillage. You can avoid placing the motorcycle on the side stand and holding it while refilling. It will help you keep the fuel tank at the correct level and position for filling.
Step- 3: Stand In A Safe Place With Your Motorcycle
Stand in between the pump and your motorcycle for a safe place. A gas station is a place where vehicles roll infrequently. It is hard to keep track of the vehicles while filling the gas tank. So, stand in the safe place between the pump and your motorcycle.
Step- 4: Fill Your Gas Tank
Now, you have to insert the filling nozzle inside your trunk. While inserting, make sure you have inserted the nozzle all the way, or at least more than halfway. In the case of cars, you generally do not need to do that. Longer filler necks allow bubbles while filling, which restricts the filler nozzles. So, it is easy to know and control the filling process.
Motorcycles have tiny filler necks. Some motorcycles even do not have them. So, it’s harder to guess the level up to which the tank has been filled in an instant. It runs the risk of unwanted spillage of the fuel. Also, a small amount of air is needed to be kept in the fuel tank. You might have already known, the fuel used in the motorcycle is exceptionally conducive to heat. It expands to heat very quickly.
In the tank, the air space will allow the fuel to expand. The fuel will not overflow through the breather hose as you are riding. If you have an idea of how much fuel was left on your tank before filling, you may be able to guess the right time to stop the fill by taking a look at the numbers on the filling machine.
Also, use your hearing to understand the level of the fuel. If you do not get it right away, do not worry. You will learn to guess correctly over time.
How To Clean Rust And Seal A Motorcycle Gas Tank? (7 Steps)
Isn’t it a simple matter to clean rust and seal the gas tank of a motorcycle? In the end, the answer is both “yes” and “no.” To understand this paradox, read the following steps:
Step-1: Remove A Few Accessories
The process will start by removing the seat of your motorcycle. After that, loosen off the back gas tank bolt. The tank can be a little bit dirtier most of the time than your usual prediction. It is because your tank is empty for a while. Before you give it an acid wash, you should add a little gas to your gas tank if it’s empty.
Step-2: Remove The Petcock
After you have sloshed a little bit of gas around in your gas tank , now it’s time to locate your petcock. Don’t try to drain the gas out through your petcock because there is a ton of crap in it. As a consequence, your petcock will just get clogged.
So, remove your petcock first, even if it’s an old one. You might be able to reuse it. Then keep rinsing the tank out until the gas comes out clean.
Step-3: Seal Off The Petcock Hole
Now, you need to seal off the petcock hole. Use a black rubber hose that fits loosely over the post. Cut it down a little bit if required, then find some sort of a bolt that also loosely fits in the hose. You will need a couple of hose clamps too.
First, clamp the bolt into the hose as tight as you can get it. Toss another clamp on there, get it on the post, and tighten it down. Now the petcock is sealed off.
Step- 4: Use Acid To Remove Rust
Make sure you have a large plastic container, wear rubber gloves, and goggles to cover your eyes. Because now we are going to give it an acid wash. If the acid somehow gets into your eyes, you might lose sight. So, be careful while cleaning the motorcycle gas tank.
Cover the paint with some plastics. Use a funnel to pour the acid into the tank. When rust is really bad, you should completely fill up your gas tank and let it sit for a few days until it starts looking better. The acid will break up the rust inside the tank.
Step-5: Drain The Acid
Next, you need to drain this stuff back into the container to reuse them again. The hose with the bolt and clamp trick actually works on the bottom and never leaks or anything. Now the acid is outside the gas tank, and the metal should be etched.
That means you’re done with the cleaning of your gas tank. Prepare a little bit of solution by mixing baking soda with water. Use this solution to neutralize the acid, and then it will no longer be bad for the earth or human beings.
Step- 6: Clean The Motorcycle Gas Tank
Plug the petcock back up once you have gotten all the acid out of the tank. Rinse the tank out with any type of solvent that is paint friendly, such as paint thinner, mineral spirits, or rubbing alcohol. As part of that process, the inside of the gas tank will be cleaned to remove that acid from the metal. You may know that acid is not good at all for the sealer.
After you have gotten all of that crap out of the motorcycle gas tank, give the tank a good clean before sloshing around all over it. Take a heat gun or a blow dryer and stick it in the neck of the tank. Turn it on low and wait till dry.
Do this part with the petcock open so that whatever’s in there can drain out through it. The process can take 10-15 minutes. When it is done, take the tank around, and you will hear no liquid sounds. Shine a flashlight inside the tank to look around and make sure it’s dry and cool.
Step-7: Seal Your Gas Tank:
Once you are sure your gas tank is cooled down and dry, plug up the petcock hole, but you need to use tape this time. After that, take a gas tank sealer and give it a good shake. Pour the whole bottle of sealer into the gas tank.
Next, put the gas cap back on and wash it around. Make sure you cover the whole surface of the inside of the gas tank with the sealer. Hopefully, if you tape over the pinholes, the sealer will come through and seal them up.
Once you’re sure you have covered the whole inside of the gas tank with the sealer, then pull that tape off and drain the stuff back into the bottle. That’s it. With that, you are successfully able to clean rust and seal the motorcycle gas tank.